
- ایمان برومندزاده
- 21 تیر 1398 ساعت 14:54
- 0
- 2423
-
0
آموزش ایجاد AlertDialog شخصی (Custom) در اندروید
در این آموزش قصد داریم با همدیگر یک Alert Dialog شخصی در اندروید ایجاد نماییم که بتوانیم المنت های دلخواه خود را در آن قرار دهیم. برای افزودن این قابلیت Alert Dialog ما دارای یک فایل xml خواهد بود که در آن می توانیم طرح نهایی Alert Dialog خود را ایجاد نماییم.
همانطور که می دانید Alert Dialog ها کار نمایش اطلاعات را در یک صفحه بصورت پاپ آپ به عهده دارند. از این کلاس می توانید برای نمایش های پیغام های خطا، نمایش لیست و .... استفاده نمایید.
در این آموزش قصد داریم با همدیگر یک Alert Dialog شخصی در اندروید ایجاد نماییم که بتوانیم المنت های دلخواه خود را در آن قرار دهیم. برای افزودن این قابلیت Alert Dialog ما دارای یک فایل xml خواهد بود که در آن می توانیم طرح نهایی Alert Dialog خود را ایجاد نماییم.
توجه: برای متوجه شدن بهتر این آموزش بهتر است اطلاعاتی در مورد Alert Dialog داشته باشید.
ایجاد AlertDialog شخصی (Custom) در اندروید
- برای شروع یک پروژه جدید در اندروید استودیو ایجاد نمایید
- فایل colors.xml را باز و کد زیر را در آن قرار دهید:
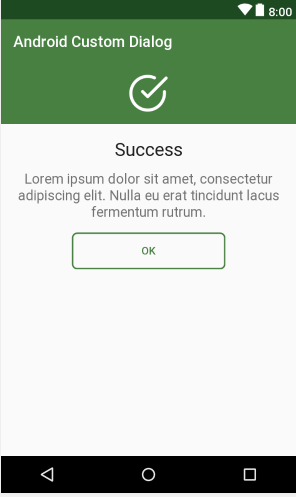
طرح نهایی AlertDialog ما بصورت زیر خواهد شد:
- در این مرحله و با استفاده از کد زیر backgorund مربوط به دکمه را ایجاد میکنیم. برای اینکار در دایرکتوری drawable یک فایل بنام button_background.xml و کدهای زیر را در آن قرار دهید:
<?xml version="1.0" encoding="utf-8"?>
<selector xmlns:android="http://schemas.android.com/apk/res/android">

    <item>
        <shape>
            <stroke android:width="2dp" android:color="@color/colorPrimary" />

            <solid android:color="@android:color/transparent" />

            <corners android:bottomLeftRadius="6dp" android:bottomRightRadius="6dp" android:topLeftRadius="6dp" android:topRightRadius="6dp" />
        </shape>
    </item>

</selector>
در همین دایرکیتوری یک فایل دیگر بنام ic_success.xml برای نمایش ایکن مورد نظر ایجاد و کد زیر را در آن قرار دهید:
<vector android:height="24dp" android:viewportHeight="512"
    android:viewportWidth="512" android:width="24dp" xmlns:android="http://schemas.android.com/apk/res/android">
    <path android:fillColor="#FFFFFF" android:pathData="M468.907,214.604c-11.423,0 -20.682,9.26 -20.682,20.682v20.831c-0.031,54.338 -21.221,105.412 -59.666,143.812c-38.417,38.372 -89.467,59.5 -143.761,59.5c-0.04,0 -0.08,0 -0.12,0C132.506,459.365 41.3,368.056 41.364,255.883c0.031,-54.337 21.221,-105.411 59.667,-143.813c38.417,-38.372 89.468,-59.5 143.761,-59.5c0.04,0 0.08,0 0.12,0c28.672,0.016 56.49,5.942 82.68,17.611c10.436,4.65 22.659,-0.041 27.309,-10.474c4.648,-10.433 -0.04,-22.659 -10.474,-27.309c-31.516,-14.043 -64.989,-21.173 -99.492,-21.192c-0.052,0 -0.092,0 -0.144,0c-65.329,0 -126.767,25.428 -172.993,71.6C25.536,129.014 0.038,190.473 0,255.861c-0.037,65.386 25.389,126.874 71.599,173.136c46.21,46.262 107.668,71.76 173.055,71.798c0.051,0 0.092,0 0.144,0c65.329,0 126.767,-25.427 172.993,-71.6c46.262,-46.209 71.76,-107.668 71.798,-173.066v-20.842C489.589,223.864 480.33,214.604 468.907,214.604z"/>
    <path android:fillColor="#FFFFFF" android:pathData="M505.942,39.803c-8.077,-8.076 -21.172,-8.076 -29.249,0L244.794,271.701l-52.609,-52.609c-8.076,-8.077 -21.172,-8.077 -29.248,0c-8.077,8.077 -8.077,21.172 0,29.249l67.234,67.234c4.038,4.039 9.332,6.058 14.625,6.058c5.293,0 10.586,-2.019 14.625,-6.058L505.942,69.052C514.019,60.975 514.019,47.88 505.942,39.803z"/>
</vector>
البته شما می توانید از ایکن دلخواه خود نیز استفاده نمایید( یعنی اجباری نمی باشد:))))) )
حال برای نمایش Alert Dialog یک فایل ایجاد میکنیم که شما میتوانید المنت های دلخواه خود را در این فایل قرار دهید.
در دایرکتوری layout یک فایل بنام my_dialog.xml ایجاد و کدهای زیر را در آن قرار دهید:
<?xml version="1.0" encoding="utf-8"?>
<LinearLayout xmlns:android="http://schemas.android.com/apk/res/android"
    android:layout_width="match_parent"
    android:layout_height="match_parent"
    android:orientation="vertical">

    <RelativeLayout
        android:layout_width="match_parent"
        android:layout_height="80dp"
        android:background="@color/colorPrimary">

        <ImageView
            android:layout_width="50dp"
            android:layout_height="50dp"
            android:layout_centerInParent="true"
            android:background="@drawable/ic_success" />

    </RelativeLayout>

    <LinearLayout
        android:layout_width="match_parent"
        android:layout_height="wrap_content"
        android:orientation="vertical"
        android:padding="16dp">

        <TextView
            android:layout_width="match_parent"
            android:layout_height="wrap_content"
            android:text="Success"
            android:textAlignment="center"
            android:textAppearance="@style/TextAppearance.AppCompat.Headline" />

        <TextView
            android:layout_width="match_parent"
            android:layout_height="wrap_content"
            android:layout_marginTop="10dp"
            android:text="Lorem ipsum dolor sit amet, consectetur adipiscing elit. Nulla eu erat tincidunt lacus fermentum rutrum."
            android:textAlignment="center"
            android:textAppearance="@style/TextAppearance.AppCompat.Medium" />

        <Button
            android:id="@+id/buttonOk"
            android:layout_width="200dp"
            android:layout_height="wrap_content"
            android:layout_gravity="center"
            android:layout_marginTop="15dp"
            android:background="@drawable/button_background"
            android:text="Ok"
            android:textColor="@color/colorPrimary" />

    </LinearLayout>

</LinearLayout>
کد بالا طرح کلی آلرت دیالوگ ما را که بصورت زیر می باشد ایجاد میکند.
- حال برای نمایش Alert Dialog ما نیاز به یک دکمه داریم که با کلیک بر روی آن، صفحه Alert دیالوگ برای ما نمایش داده شود.
برای اینکار شما کافیست کدهای زیر را به جای کدهای درون activity_main.xml قرار دهید
<?xml version="1.0" encoding="utf-8"?>
<RelativeLayout xmlns:android="http://schemas.android.com/apk/res/android"
    xmlns:app="http://schemas.android.com/apk/res-auto"
    xmlns:tools="http://schemas.android.com/tools"
    android:layout_width="match_parent"
    android:layout_height="match_parent"
    tools:context=".MainActivity">


    <Button
        android:id="@+id/buttonShowDialog"
        android:layout_width="wrap_content"
        android:layout_height="wrap_content"
        android:layout_centerInParent="true"
        android:background="@color/colorPrimary"
        android:padding="15dp"
        android:text="Android Custom Dialog Example"
        android:textAllCaps="false"
        android:textColor="#ffffff" />

</RelativeLayout>
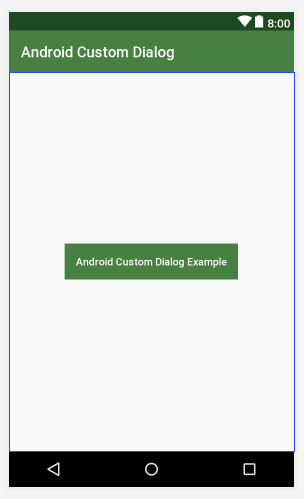
بنابراین طرح نهایی فایل activity_main.xml شما بصورت زیر خواهد بود:
- حالا در مرحله آخر ما قصد نمایش Alert Dialog خود را داریم. برای اینکار فایل MainActivity.java را باز کنید و کدهای زیر را در آن قرار دهید:
package net.simplifiedcoding.androidcustomdialog;

import android.support.v7.app.AlertDialog;
import android.support.v7.app.AppCompatActivity;
import android.os.Bundle;
import android.view.LayoutInflater;
import android.view.View;
import android.view.ViewGroup;

public class MainActivity extends AppCompatActivity {

    @Override
    protected void onCreate(Bundle savedInstanceState) {
        super.onCreate(savedInstanceState);
        setContentView(R.layout.activity_main);

        //attaching click listener
        findViewById(R.id.buttonShowDialog).setOnClickListener(new View.OnClickListener() {
            @Override
            public void onClick(View v) {

                //calling this method to show our android custom alert dialog
                showCustomDialog();
            }
        });
    }

    private void showCustomDialog() {
        //before inflating the custom alert dialog layout, we will get the current activity viewgroup
        ViewGroup viewGroup = findViewById(android.R.id.content);

        //then we will inflate the custom alert dialog xml that we created
        View dialogView = LayoutInflater.from(this).inflate(R.layout.my_dialog, viewGroup, false);


        //Now we need an AlertDialog.Builder object
        AlertDialog.Builder builder = new AlertDialog.Builder(this);

        //setting the view of the builder to our custom view that we already inflated
        builder.setView(dialogView);

        //finally creating the alert dialog and displaying it
        AlertDialog alertDialog = builder.create();
        alertDialog.show();
    }
}
همونطور که مشاهده می کنید ما یک تابع بنام showCustomDialog() تعریف کردیم که کار نمایش Alert Dialog را بر عهده دارد.
در این تابع ابتدا با استفاده از viewgroup مقدار اکتیویتی جاری را گرفته ایم. و سپس با یک LayoutInflater لایه ایجاد شده توسط خودمان را به عنوان لایه Alert Dialog معرفی کردیم ودر نهایت با دستور alertDialog.show(); آن را نمایش خواهیم داد.
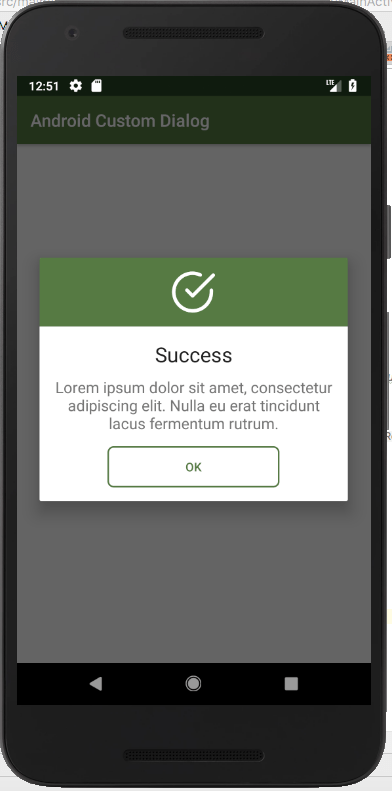
طرح نهایی ما بصورت زیر خواهد بود:
امیدوارم از این آموزش نیز لذت برده باشید. در صورتی که سوال یا پیشنهادی دارید یا روش بهتری برای ایجاد alert dialog سراغ دارید از بخش نظرات ارسال کنید.
منبع(simplifiedcoding.net)
ارسال نظر
برای اطلاع از پاسخ به نظر شما می توانید ایمیل یا شماره موبایل خود را وارد نمایید. *
ایمیل و شماره موبایل شما کاملا مخفی خواهد ماند و در سایت نمایش داده نخواهد شد. *
هنوز برای این مطلب نظری ارسال نشده است!